In the last post, we have setup a Ampere A1 Compute instance in OCI and get nginx running. This post walks you through building a minimal Django project locally and deploying it to the VM. We’ll use the default Oracle Linux image, Gunicorn, and Nginx for production hosting.
Here’s a rundown of what we will do in this post:
- Connect to the VM through SSH
- Clone an existing Django app to the VM
- Setup Django environment and Gunicorn (a WSGI application server) to interface with our Django app
- Setup Nginx to pass appropriate incoming HTTP requests to Gunicorn
- Test and troubleshoot any errors that arise. I had a lot of hiccups along the way, that’s why I decided to document this process so you can have a smoother ride than I did. For all steps, I will also list the corresponding ones for using a Ubuntu image if they differ.
Create Django project locally
I assume you already have a working Django project. If not, we’ll just create a demo helloworld project in a local desktop machine.
install Django and creates a project named
helloworldin the current directory (.). We then initiate a single app namedwebright alongside manage.pydjango-admin startproject helloworld . python manage.py startapp webOur file directory now looks like this
.
├── manage.py
├── helloworld/
│   ├── __init__.py
│   └── settings.py
└── web/
    ├── __init__.py
    ├── models.py
    └── views.py
In
helloworld/settings.py, add our newwebapp:INSTALLED_APPS = [ ..., 'web', ]Define a simple view in
web/views.py:from django.http import HttpResponse def home(request): return HttpResponse("Hello World!")Wire the view to a URL in
helloworld/urls.py:from django.urls import path from web.views import home urlpatterns = [ path('', home, name='home'), ]Now our app is ready to use. Let’s test locally:
python manage.py migrate
python manage.py runserver
Visit http://127.0.0.1:8000/ to see Hello World!
Now we have a working demo app. Let’s create a requirements.txt:
pip freeze > requirements.txtso we can rebuild the environment in the VM.
We can then push everything to an existing Github repository, to be cloned in our Oracle VM.
initialize repository:
git initexclude files from sync by creating a
.gitignorefile with the following content.venv *.pyc db.sqlite3commit and push changes
git add *
git commit -m "initial checkin"
git remote add origin PATH.TO.GITHUB
git push -u origin master
Deploy Django project on the VM
In our SSH session, clone your Github repo with
git clone PATH.TO.GITHUB.REPOto your folderIn the project root folder, create and activate a virtual environment, then install dependency requirements:
python3 -m venv venv
source venv/bin/activate
pip install --upgrade pip
pip install -r requirements.txt
pip install gunicorn
If during the installation of Django, you get error
ERROR: Could not find a version that satisfies the requirement Django==5.2.4, identify the latest version in the error list, or runpip index versions Django. You’ll see the latest LTS in the 4.2.x line (e.g. 4.2.23). Update your your requirements to a supported Django release and reinstall:pip install --upgrade pip setuptools wheel pip install -r requirements.txtApply migrations & collect Static.
python manage.py migrate
python manage.py collectstatic --noinput
Set public IP in
ALLOWED_HOSTSOpen
settings.pyin our project’s config foldersudo nano /home/opc/ociProj/helloworld/settings.pyLocate the ALLOWED_HOSTS line. Replace it with our public IP (and any other hosts you need):
ALLOWED_HOSTS = ['PUBLIC_IP', '127.0.0.1', 'localhost']
Configure Gunicorn server
We will now install Gunicorn, a WSGI (Web Server Gateway Interface) HTTP server that runs our Django app to produce dynamic content, and passes the response to Nginx.
Confirm our project root:
pwdCheck that Gunicorn is installed and note its path:
which gunicornConfirm the exact path and permissions of your Gunicorn binary
ls -l PATH/TO/GUNICORN_BINARYWe should see something like:-rwxr-xr-x 1 opc opc … PATH/TO/GUNICORN_BINARYIf the “x” bits are missing, systemd (running as user opc) can’t execute it. Fix the permissions if needed by
sudo chmod 755 PATH/TO/GUNICORN_BINARYTo keep Gunicorn running in the background continuously, we have to set it up as a systemd service. To do so, place a service definition at
/etc/systemd/system/gunicorn.service.sudo nano /etc/systemd/system/gunicorn.serviceIn this file,
- User/Group: Runs Gunicorn as opc or ubuntu (your non-root user).
- WorkingDirectory: our Django project root where manage.py lives, must match
pwd - ExecStart: absolute path to the Gunicorn binary, must match
which gunicorn. It specifies number of workers, socket bind, and our Django WSGI module.
[Unit]
Description=gunicorn daemon for django-hello
After=network.target

[Service]
User=opc
Group=opc
WorkingDirectory=/home/opc/ociProj
ExecStart=/home/opc/venv/bin/gunicorn \
    --workers 3 \
    --bind unix:/home/opc/ociProj/gunicorn.sock \
    helloworld.wsgi:application

[Install]
WantedBy=multi-user.target
Reload systemctl daemon to pick up our new unit file
sudo systemctl daemon-reloadEnable and start Gunicorn:
sudo systemctl enable --now gunicornenableensures Gunicorn starts on boot.--nowstarts it immediately.
Verify it’s running:
sudo systemctl status gunicornOnce we see
active (running), Gunicorn is up. We will verify Gunicorn is serving our Django app on the VM bycurl --unix-socket /home/opc/ociProj/gunicorn.sock http://localhostWe should see the “Hello World” HTML.
Next, we will configure Nginx to proxy traffic to gunicorn.sock.
Configure Nginx as reverse proxy
reverse proxy to Gunicorn and serve Django app
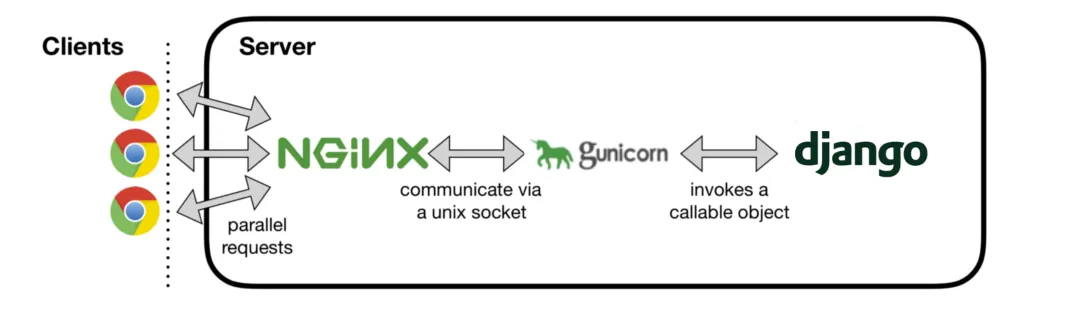
As seen in this diagram, Nginx sits in front of Gunicorn, handling client requests, managing static files, and improving security and load balancing by forwarding dynamic requests to Gunicorn. It also determines where (app endpoint) to route the traffic to.
Since Nginx comes with a default site, we need to make sure when we hit our public IP, our Django app is served instead.
By default, Nginx service listens on port 80 for all server names. Server names are defined using the
server_namedirective, and NGINX determines which server block to use for a given request by evaluating its configuration files.
specify Django to be the default
Create our Django configuration file for Nginx /etc/nginx/conf.d/django-hello.conf manually as follows
server {
    # specify Django to be the default
    # listen to both IPv4 & IPv6 requests for this server on port 80
    listen 80 default_server;
    listen [::]:80 default_server;
    server_name _;

    # Serve static files in Django folder
    location /static/ {
        alias /home/opc/ociProj/static/;
    }

    # All other traffic goes to Gunicorn
    location / {
        proxy_set_header Host $host;
        proxy_set_header X-Real-IP $remote_addr;
        proxy_set_header X-Forwarded-For $proxy_add_x_forwarded_for;
        proxy_set_header X-Forwarded-Proto $scheme;
        # Ensure the proxy_pass line exactly matches where the Gunicorn socket lives
        proxy_pass http://unix:/home/opc/django/ociProj/gunicorn.sock;
    }
}
When Nginx receives a request in a location block that uses proxy_pass, it:
- knows that this block is a reverse-proxy, not a static file handler.
http://indicates HTTP protocol will be used over the socket.unix:prefix tells Nginx to use a Unix socket file instead of TCP/home/opc/./blog/gunicorn.sockpoints to the Gunicorn server bound at /home/opc/django/ociProj/gunicorn.sock. It will forward the original client request (method, headers, body) to Gunicorn- Relays Gunicorn’s response back to the client
In Ubuntu, NGINX uses two folders to control what sites to serve: sites-available and sites-enabled. sites-available contains configuration files for all available sites on this server, whereas sites-enabled contains the symbolic links for each enabled site in the sites-available folder.
Therefore, we need to perform an extra step to enable our Django configuration by sym-linking it to the sites-enabled folder:
sudo ln -s /etc/nginx/conf.d/django-hello.conf /etc/nginx/sites-enabledBy doing so, it allows the main /etc/nginx/nginx.conf config file to pull it in with an include statement.
remove Nginx default site
For RHEL-based systems (including Oracle Linux), we need to comment out the built-in block in /etc/nginx/nginx.conf by finding the first server { … } block under the http { section. We can either delete it or prefix each line with #.
For Debian based distro (including Ubuntu), the default site config is in /etc/nginx/sites-available/default.conf and symbolically linked from /etc/nginx/sites-enabled/. We need to turn off the default site without touching the original file in sites-available by removing its symlink in sites-enabled. This can be done by sudo rm /etc/nginx/sites-enabled/default
After that, we can check if our configuration file was correctly written, and reload Nginx
sudo nginx -t
sudo systemctl restart nginx
nginx -t should output syntax is ok and the configuratoin file test is successful.
We can now open a browser to access our public IP. We should see the “Hello World” message properly served.
Errors
Since I’ve run into a lot of errors along the process, I decided to document each of them along with the solutions I used.
Nginx not loading Django app but default site
Some tests to try
Make sure you have removed or commented out the entire port 80 server block in your main
/etc/nginx/nginx.confor any config file under/etc/nginx/default.d/oretc/nginx/conf.d/(except django-hello.conf).To locate the Default HTTP Block, run
sudo nginx -T | sed -n '1,200p'. In that output, look for the firstserver { … }underhttp {and note the file path printed just above it, for example:configuration file /etc/nginx/nginx.conf:.Ensure your Django vhost in
/etc/nginx/conf.d/django-hello.confusesdefault_serveron both IPv4 & IPv6:server { # specify Django to be the default # listen to both IPv4 & IPv6 requests for # this server on port 80 listen 80 default_server; listen [::]:80 default_server; server_name _;Not
  listen      80;
  listen      [::]:80;
  server_name _;
  # this is serving the default page
  location / {
    root   /usr/share/nginx/html;
    index  index.html index.htm;
}
If it still shows the default test page, double-check that no other
.conffiles in/etc/nginx/conf.d/or/etc/nginx/default.d/are defining a server block on port 80.You can locate every port 80 listener by running
sudo grep -R "listen\s*80" /etc/nginx. Double-check you only have your Django block on 80. If you see some other configuration files showing up, either remove it likesudo rm /etc/nginx/conf.d/welcome.confor rename it out of the way withsudo mv /etc/nginx/conf.d/welcome.conf /etc/nginx/
Nginx reports conflicts
sudo nginx -t sudo systemctl reload nginx nginx returns
[warn] conflicting server name "_" on 0.0.0.0:80, ignored nginx: [warn] conflicting server name "_" on [::]:80, ignored This means that two server blocks are claiming as default. Following the steps in the above section to disable the built-in block in nginx.conf.
Gunicorn: Exec Failure (Status 203/EXEC)
Starting Gunicorn gives:
Active: failed (Result: exit-code) since .... Process: 81017 ExecStart=/home/opc/venv/bin/gunicorn --workers 3 --bind unix:/home/opc/ociProj/gunicorn.sock> Main PID: 81017 (code=exited, status=203/EXEC)A status 203/EXEC means systemd can’t execute the binary you pointed at. On Oracle Linux with SELinux enforcing, binaries under /home are blocked by default, even if their UNIX perms are 755. Check SELinux Mode by getenforce.
If it says Enforcing, SELinux is likely denying execution under /home. We can temporarily switch to permissive to confirm:
sudo setenforce Permissive
sudo systemctl restart gunicorn
sudo systemctl status gunicorn
If Gunicorn comes up Active (running), SELinux was the culprit.
If you stick with SELinux enforcing, it’s best to keep apps under /opt or /srv.
‘/home/./blog/gunicorn.sock’: No such file or directory
UNIX domain sockets are ephemeral. They are created when Gunicorn starts and binds to it, and removed automatically when Gunicorn exits (or crashes). Therefore, every time your service fails or you stop Gunicorn manually, the .sock file will be deleted.
In other situations when you have no socket file (and thus Nginx can’t proxy anything), Gunicorn never actually came up, so it never bound /home/./blog/gunicorn.sock. We need to
- confirm the correct WSGI module path,
- fix systemd unit
- make sure no permission problem
- test Gunicorn manually
- restart
Check Your Project’s WSGI Module
In your project root (/home/opc/ociProj), list the files:
cd /home/opc/ociProj
ls
You should see something like:
- manage.py
- a subdirectory named after your Django project
- inside that subdir, a
wsgi.py
For example, if your Django project folder is actually named helloworld, your WSGI import path will be: helloworld.wsgi:application
Fix systemd Service
sudo sed -n '1,20p' /etc/systemd/system/gunicorn.servicemake sure everything looks right, if not edit it to ensure these lines match exactly:
WorkingDirectory=/home/opc/ociProj
ExecStart=/home/opc/venv/bin/gunicorn \
 --workers 3 \
 --bind unix:/home/opc/ociProj/gunicorn.sock \
 helloworld.wsgi:application
Replace helloworld.wsgi:application with whatever your actual WSGI path is from step 1.
Test Gunicorn Directly
Try running Gunicorn on the command line:
gunicorn helloworld.wsgi:application \
 --workers 3 \
 --bind unix:/home/opc/ociProj/gunicorn.sock
If there is no errors, then Gunicorn starts up and you get something like:
[2025-07-12 01:00:00 +0000] [12345] [INFO] Listening at: unix:/home/opc/ociProj/gunicorn.sockIf you still get Permission denied, or ImportError complaining about
No module named …, note the message. If it starts cleanly, hit Ctrl+C to stop it.Reload & Start Gunicorn
sudo systemctl daemon-reload
sudo systemctl restart gunicorn
sudo systemctl status gunicorn
If it’s active (running), check the socket again:
ls -l /home/opc/ociProj/gunicorn.sockOnce the socket exists and Gunicorn is running, reload Nginx:
sudo nginx -t
sudo systemctl reload nginx
400 Bad Request
IF curl --unix-socket /home/ubuntu/ociProj/gunicorn.sock http://localhost/ works but curl -i http://127.0.0.1/ does not, make sure to add localhost and 127.0.0.1 to ALLOWED_HOST in settings.py.
502 Bad Gateway
It means Nginx can’t reach Gunicorn socket even though it exists. Let’s debug the socket and Gunicorn service.
Check the Nginx Error Log
First, let’s see exactly why Nginx is refusing the socket by examining the last couple of lines in the error log:
sudo tail -n 20 /var/log/nginx/error.logLook for messages like “connect() to unix:/home/./blog/gunicorn.sock failed (13: Permission denied)” when connecting to the Unix socket, or “No such file or directory” for the socket path. That message tells us whether it’s a traversal permmission issue or a typo in the path.
The traversal permmission issue is a very common cause of the 502 Bad Gateway problem, as it happened initially to both my Oracle Linux and Ubuntu VM images. This usually means Nginx’s user (www-data on Ubuntu) can’t traverse into the home directory where the socket lives. Unix socket permission checks include the execute bit on every parent directory.
Let’s say our socket is at /home/ubuntu/ociProj/gunicorn.sock. Even if this file is read/writable by
others(everyone other than the file’s owner and users in the file’s group), every parent directory must be “searchable” (x) byothersthat include the Nginx worker user. If /home/ubuntu or /home/ubuntu/ociProj isn’t searchable byothers, www-data can’t reach the file.Let’s check and fix this by first showing current perms for the parent folders:
ls -ld /home/opc /home/opc/ociProj. In both my Oracle Linux and Ubuntu VMs,/home/opcand/home/ubuntudo not havexforothers. Once verified, we can loosen permissions on our project directory. If any lack ‘x’ for others, add it:sudo chmod o+x /home/opc sudo chmod o+x /home/opc/ociProjThis ensures Nginx (running as user nginx or nobody) can enter those folders to reach the socket.
After that, reload Gunicorn and Nginx:
sudo systemctl restart gunicorn
sudo systemctl reload nginx
Verify Gunicorn Is Running
sudo systemctl status gunicornIf it’s inactive or failed, view its logs:
sudo journalctl -u gunicorn -n 50 --no-pagerLook for errors binding the socket or importing your WSGI module.
- If the service failed or you see “permission denied,” SELinux is still blocking execution. See step 4 below.
- If it’s active, note any socket‐bind errors.
Inspect the socket
ls -l /home/opc/ociProj/gunicorn.sockThe socket must exist and permissions should allow the opc user to read/write. E.g.:
srw-rw---- 1 opc opc … gunicorn.sockIf it’s missing, Gunicorn never bound it.If it’s there but owned by root or lacks rw for opc, fix permission by
sudo chown opc:opc /home/opc/ociProj/gunicorn.sock
sudo chmod 660   /home/opc/ociProj/gunicorn.sock
Is SELinux blocking it?
Check enforcement:
getenforceIf it’s Permissive, SELinux isn’t your blocker right now. If it’s Enforcing, you’ll see exec or socket denies in
/var/log/audit/audit.logor via audit2why.Label the Socket for Nginx
On Oracle Linux, Nginx can only talk to sockets labeled
httpd_var_run_t. Let’s apply that:sudo semanage fcontext -a -t httpd_var_run_t "/home/opc/django/ociProj/gunicorn.sock" sudo restorecon -v /home/opc/django/ociProj/gunicorn.sock sudo systemctl reload nginxTest Socket Connectivity Manually
From the VM shell, bypass Nginx and hit Gunicorn directly:
curl --unix-socket /home/opc/ociProj/gunicorn.sock http://localhost/You should see your “Hello World” HTML.
If you get Permission denied, it confirms a perm/traversal issue.
If you get Connection refused or empty, Gunicorn might not actually be listening there. Restart it and recheck.
Run from your project root to ensure it binds cleanly:
cd /home/opc/ociProj
source /blog/venv/bin/activate
gunicorn helloworld.wsgi:application \
 --workers 3 \
 --bind unix:/home/opc/ociProj/gunicorn.sock
If this errors with “Permission denied” or “No module named …”, note the message and Ctrl-C.
If it still fails, move the socket to /run by editing your Gunicorn unit to bind
unix:/run/gunicorn.sockand update Nginx accordingly.Or use a TCP bind:
–bind 127.0.0.1:8000in Gunicorn andproxy_pass http://127.0.0.1:8000;in Nginx configuration. This bypasses all socket/perms issues.
DisallowedHost
DisallowedHost at / Invalid HTTP_HOST header: 'x.x.x.x'. You may need to add 'x.x.x.x' to ALLOWED_HOSTS.
This means that Django is rejecting requests because your public IP isn’t listed in ALLOWED_HOSTS. We can fix it by:
Open settings.py in your project’s config folder
sudo nano /home/opc/django/ociProj/helloworld/settings.pyLocate the ALLOWED_HOSTS line. Replace it with your IP (and any other hosts you need):
ALLOWED_HOSTS = ['x.x.x.x', '127.0.0.1', 'localhost']– If you’ll use a domain later, add it here too – For quick testing you can use [’*’] (not recommended in production)Save (Ctrl+O ↵) and exit (Ctrl+X).
Restart Gunicorn
The updated settings only take effect once you reload the application server:
sudo systemctl restart gunicorn
sudo systemctl status gunicorn
Ensure it’s active (running) without errors.
Reload Nginx & test
sudo nginx -t
sudo systemctl reload nginx